How-To-Make Instructions For Tail Fin Device
- max2951
- May 20, 2022
- 3 min read
Updated: May 12, 2023
Our Tail Fin and Vortex devices can be build by anyone who has access to a standard fab cafe tool selection.
We are aiming to open-source our designs to make the experience of sampling micro plastic accessible to a wide range of people.
We hope that the know-how we could accumulate so far will be beneficial to your projects!


What is the Tail Fin device?
The Tail Fin device is funnelling ocean waves through a filter mesh which can catch micro plastic. During high tide, depending on the beach characteristics, the mesh gets filled up with sand in about 15-20 minutes. After that, the mesh frame can be unclipped for examining the caught material closer for micro plastic.
Due to the use of folded sheet material and reusable clip rivets, the device folds completely flat when not in use and thus can be easily transported or stored.
Through repeated sampling in a variety of environments with the Tail Fin device, more insight can be gained on how much micro plastic floats in which areas.
Preparation
Shopping list
Equipment
3D Printer (necessary)
Step-By-Step Manual
Print out
Print out the cutting patterns - in this case we used Adobe Acrobat to arrange a tile layout from A3-sized paper.
Puzzle the single sheets together and fix them with masking tape. Glue the resulting cutting pattern onto the PE foam sheets using a removable adhesive such as weak spray glue or double sided tape.


Cut out the parts
Cut out the parts along the strong black lines. For the holes use a 10mm hole puncher or a drill with a 9.5-10mm bit.


Half-cut the folding lines
Only slightly cut the surface of the thinner blue lines.
After removing the cutting paper, use a V-shaped blade and carve along the surface cut without carving out more than half of the materials thickness. Along those carved lines the material can be bent easily. In case the resulting edge appears too weak, slightly burning the open side of the edge with a lighter will melt it together and thus reinforce it.


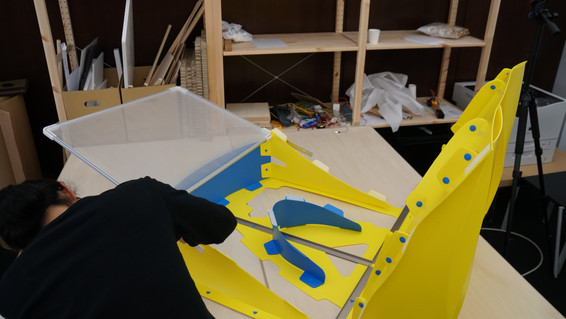
Assembling the fins
Bend the sheets along the bending lines with the carving technique described before. Clipping together the tip using the clip-rivets will fixate the shape.


Making the slope
Attach the fins to the slope sheet so that the latter will be bent into its final slope shape.


Preparing the aluminium bars
Drill 10mm holes into the Aluminium L-profile and flat bar pieces in the positions marked in the illustration.


Build the bottom piece
Attach the supporting parts to the sides and backside of the bottom piece. Fold all the tabs towards the outside. Arrange the Aluminium L-profiles with holes in them to a T shape and attach them to the bottom sheet with clip-locks.
Glue the first side of the velcro tape to the tabs folded outwards.


Assembling the body
Align the tips of the bottom and slope sheet and fixate them with duct tape. Once the they are fixed together, attach the other side of the velcro tape onto the underside of the slope sheet in a matching position to the velcro tape on the tabs of the supporting side parts and fixate the slope piece to the supporting side pieces.


Assemble the filter frame
Slide the Aluminium C profile pieces into the 4 3D-printed corner pieces and create the frame structure. Put the frame structure on a table with the open side of the C profile facing upwards and prepare a filter mesh slightly bigger than the filter frame. Fixate the mesh to the frame by utilising the rubber tube and pushing it down together with the mesh into the C-profile with a fixation roller if available.


Final Assembly
Now attach the filter frame with the main body using 4 clip-locks.


Completion
Now the assembly is complete!
When using the tail fin device make sure to fix it on position using small anchors or heavy sandbags to prevent it from being swept away by waves.


Tips
We tried to reduce the amount of micro plastic during the making to a minimum - however, the carving process of the folding lines will create a small amount of plastic chips. Please make sure to collect, separate and throw them away into a closed trash bag.
Opening fixed clip-locks can be carried out easily with use of the included 3D model of a special "key" we designed for this purpose.


Comments